Security Manager
Administrators use Security Manager to define user access to models and to individual areas, such as Model Manager, Process Manager, Report Binder, and so on. Additionally, administrators can assign access to each model and the dimension members within the model.
What you can do
In Security Manager you can do the following:
- Create users, roles, and groups (see Basic setup below)
- Assign functions to roles (see Basic setup below)
- (Optional) Assign roles to groups
- Import users
- Assign access to users and/or roles
- Assign users to roles and/or groups
- Define data access permissions at the model level
- Invite users
- Send a password reset email for one or more users
- Enable or disable a user account
- (Optional) Define password policy
- Set up and manage single sign on (SSO)
- Set up and enable multi-factor authentication
- View your current license consumption
- Generate an integration key for Account Reconciliation setup
Open Security Manager
- Click the logo at the top-left corner and select Security Manager.
Basic setup
Start by thinking about what custom roles your organization needs and assigning functions to them. Then create users and optionally, groups. Then you bring it all together by assigning users/groups to roles. Once that is accomplished, define the data permissions for users/groups.
To get started and grant users access, admins need to perform the following steps:
- Add custom roles
- Define custom roles by assigning their functions
- Define groups (optional)
- Define users
- Add users to roles and/or groups
- Define model and data access for users and/or groups
1. Add custom roles
A role wraps a set of functions, and can be broad or narrow.
Example: Some typical roles are Advanced User, Executive, and Reporting User.
- In the title bar, from the drop-down select Roles.
- Click .
- Type the name of the role and click OK.
- To add another role, repeat.
-
Click Save.
Tip: You have the choice of either saving your changes immediately by clicking Save, or letting
2. Define a custom role with functions
All the functions are pre-defined. By assigning functions you can tailor a role to your organization's precise needs.
Note: Functions can only be assigned to roles, never directly to users.
- In the title bar, from the drop-down select Roles
- Select the role.
- Select the Functions tab.
- Select each function you want to assign.
- To define another role, repeat.
- Click Save.
3. Add groups (optional)
Note: Groups are optional. They can reduce maintenance if you have many users with similar profiles, or if the sole user in a role tends to change frequently. You can, if you want, postpone adding groups until later.
- In the title bar, from the drop-down select Groups,
- Click and select the group type: Single User or Multiple Users.
- Type the name of the group and click OK.
- To add another group, repeat.
- Click Save.
4. Add users
Note: If your FP&A is running on Prophix One Portal, no user-related functions are available in Security Manager; all user-management tasks are performed in Portal.
- In the title bar, from the drop-down select Users
- Click .
- Type the First Name and Last Name and the user's email, and click .
- To add another user, repeat.
- Click Save.
Tip: You can also import users.
5. Add users to roles and/or groups
- In the title bar, from the drop-down select Users.
- Select one or more users (you can use Ctrl + Click and Shift + Click).
- Select the Roles tab.
- Select each role you want to assign.
- To add another user, repeat.
- Click Save.
To assign users to groups, select the Groups tab and follow the same steps.
6. Define model and data access
You use the Access tab to define the models and precisely what data elements a user or group can access, as well as what they can do.
- Select the user or group.
- Select the Access tab.
- Do any of the following:
- Turn on/off Read Access/Write Access.
- Define model, dimension, and hierarchy access using Selector (click ).
- Grant or revoke the Security administrator role.
- Grant or revoke the Model administrator role.
- To define access for another user or group, repeat.
-
Click Save.
Note: When you define access for a dimension's default hierarchy, the status Not defined indicates no access. However, when defining access for a dimension's alternate hierarchies, Not defined indicates full access.
Manage users, roles, and groups
Create a user, role, or group
Note: If your FP&A is running on Prophix One Portal, no user-related functions are available in Security Manager; all user-management tasks are performed in Portal.
- In the title bar, select the user, role, or group from the drop-down.
- Click .
- Complete the required information and click OK.
- Click Save.
Edit a user, role, or group
Note: If your FP&A is running on Prophix One Portal, no user-related functions are available in Security Manager; all user-management tasks are performed in Portal.
- In the title bar, select the user, role, or group from the drop-down.
- In the panel select the element and click .
- Make your changes.
- Click Save.
Enable or disable a user account
- Select one or more users.
- Click .
- Click Save.
If an account is disabled, at the next sign-in the user will see an Access Denied message.
Import users
Note: If your FP&A is running on Prophix One Portal, no user-related functions are available in Security Manager; all user-management tasks are performed in Portal.
You can populate your Users table by importing a text file.
- Create a tab-delimited text file that includes the following columns in the order specified:
- First name
- Last name
- Group Name (optional)
- Role Name (optional)
Note: When you run the import, FP&A automatically excludes any user whose email is already in the system.
- In the title bar, from the drop-down, select Users.
- Select Tools > Import Users.
- To browse for the file, click .
- Click OK.
Invite a user(s)
Note: If your FP&A is running on Prophix One Portal, no user-related functions are available in Security Manager; all user-management tasks are performed in Portal.
- In the title bar, from the drop-down, select Users.
- In the main panel, select one or more users.
- Select Tools > Send Invitation.
-
Select the language for the invitation email.
Note: The selection becomes the user's default language. You can change the language assignment in the Region settings.
- Click Send.
Send a password reset email
Note: If your FP&A is running on Prophix One Portal, no user-related functions are available in Security Manager; all user-management tasks are performed in Portal
- Select one or more users.
- Select Tools > Reset Password.
- Click Send.
Define password policy
Note: If your FP&A is running on Prophix One Portal, no user-related functions are available in Security Manager; all user-management tasks are performed in Portal.
- Select Tools > Password Policy.
- Set the rules for password creation.
- Click Close, then Save.
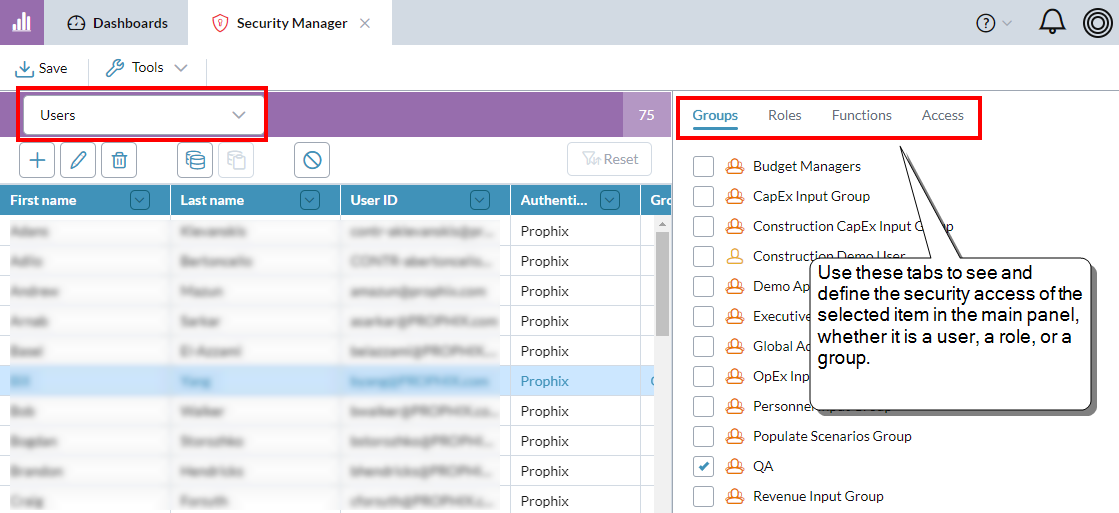
Examine and/or edit the relationships among elements
-
In the title bar, from the drop-down, select Users, Roles, or Groups.
Depending on your choice, the selected tab in the side panel changes to the most relevant.
-
In the main panel, select an item.
Tip: When the panel shows Users, you can select multiple rows.
-
To edit a row in the main panel, click ; to delete it, click .
If you are deleting users or groups, Security Manager identifies any that are included in a workflow and requires you to select replacements.
- To see/edit the assignments of the selected user(s), role, or group, select any tab and turn on/off the appropriate check boxes.
Assign functions to roles
- In the title bar, select Roles.
- Select the Functions tab.
-
Turn on/off the appropriate check boxes
Note:- Functions can never be assigned to a user directly; instead, they are assigned to roles. You then assign the user to the appropriate role.
- Assigning Process Manager access to a role automatically also gives the role Data Connector Designer access.
- Click Save.
(Optional) Assign roles to groups
Once you have roles set up with functions, you can take the added step of assigning roles to groups, thus giving an entire group of users the functions they need and reducing the complexity of future maintenance.
Define data access permissions
- Select the user or group.
- Select the Access tab.
- Select the Connection.
- Do any of the following:
- Turn on/off Read Access/Write Access.
- Define model, dimension, and hierarchy access using Selector (click ).
- Grant or revoke the Security administrator role.
- Grant or revoke the Model administrator role.
-
Click Save.
Note: When you define access for a dimension's default hierarchy, the status Not defined indicates no access. However, when defining access for a dimension's alternate hierarchies, Not defined indicates full access.
Copy the data access permissions of one user or group to another
- Select the user or group whose data access you want to copy.
- In the lip, click .
- Select the target user or group.
- Click and confirm your decision.
- Click Save.
The Security Audit Report
The Security Audit Report is an Excel file that lists all users and groups and their permission details in full. Only Global Administrators can access the report by downloading it to Excel.
The Admin roles
Three default administrative roles exist. Each gives access to different areas and is designed for specialized tasks, such as database maintenance or chart of account changes. These roles cannot be deleted. The following table summarizes the admin roles:
Global Administrator
Global Administrator is the “super user" role: it cannot be renamed or deleted and always has full access to all functions. Data and administrative access is not implied by adding a user to the role; this must be granted explicitly (which facilitates logging). The only exception is that models built by the Global Administrator are automatically granted full access. During the installation/configuration process, a domain user is added to the Global Administrator role and becomes the “first” administrative user of
Only members of the Global Administrator role can add additional users to this role.
A summary of the functions exclusive to the Global Admin role.
Security Administrator
The Security Administrator role can only perform security-related operations and monitor the status of logged-in users. The role cannot be renamed or deleted. Members of this role have access to Security Manager to adjust individual user access to data and membership in roles, can view the Audit Log, and can use the System Monitor. Security administrators may also create new roles and delete existing ones (with the exception of system-created roles). They cannot change the data permissions or role assignment of users who are members of the Global Administrator role. Members of this role cannot change their own assigned role.
Model Administrator
This system role is for business users who are responsible for managing various aspects of a model such as loading data, calculations, dimension members, and hierarchies. The role cannot be renamed or deleted. Users assigned the Model Administrator role are typically technically savvy and also possess good business knowledge about the company. Members of this role have access to all functions except Security Manager.
License consumption
In Security Manager, functions are grouped by license type.
Example: The Workflow – Online Data Entry function belongs to the Standard license type.
The license type a user "consumes" depends on the function(s) the user is assigned (always through the roles/groups the user is assigned to). The license consumed is always based on the highest level assigned.
Example: If you create the role Department Manager and assign it functions from the
View license consumption
-
Select Tools > Licensing.
Note: If you make license consumption changes that cause you to surpass your license limit, when you try to save, a warning appears.
The license types
In order, from lowest to highest, the license levels are as follows:
-
Basic
The Offline Access function.
-
Reporting
The reporting functions: Ad Hoc Analysis (read-only), Report Binder Viewer, Template Report Viewer, and Workflow – Approver/Observer.
-
Standard
The Workflow – Online Data Entry function.
-
Advanced
The Advanced functions include for example Ad Hoc Analysis - Full Access,
-
Administrative
The Administrative level includes functions such as System Hub, New Model Wizard, Model Manager,
To see the complete list of functions for each level, select the Functions tab.
How to implement licensing and security
The basic setup steps for licensing are as follows:
- Determine the unique groups of activities to be performed by users, then create the roles.
- For each role identified in the previous step, assign functions.
- Assign users to roles.
Integration key
Note: This section applies only to clients using Account Reconciliation.
An integration key is used to generate a token that authorizes a connection between Financial Planning and Analysis (FP&A) and Account Reconciliation.
To access this option, go to Tools > Integration Key.
For detailed steps on generating an integration key and connecting data to Account Reconciliation, see Set up Account Reconciliation with FP&A data.
Security Manager FAQ
How are users added?
Note: If your FP&A is running on Prophix One Portal, no user-related functions are available in Security Manager; all user-management tasks are performed in Portal.
To add users, from the User Manager you send an invitation email.
How are users defined in Security Manager?
A user is defined by their assigned functions, roles, groups, and access. Security Manager is designed to allow you to view the relationships among all these elements from any perspective.
What are functions?
A user's ability to do things is defined in terms of functions. Most functions simply control access.
Example: The Model Manager function allows the user to open Model Manager.
Some functions specify other actions; for example, the Import External Documents function.
How are functions assigned?
Functions are never assigned directly to individual users. Instead, functions are assigned to roles and/or groups. In turn, users are assigned to roles and/or groups. In other words, what you can do depends on your assigned roles and groups.
What are roles?
An administrator defines a role by granting it access to specific functions. Depending on the number and type of functions assigned to it, a role can be narrow or broad.
What are pre-defined roles?
Three pre-defined administrative roles exist. Each has a different type of security access, designed to allow for different users performing separate tasks, such as database maintenance or chart of account changes. There are also the pre-defined user roles/license types Advanced, Standard, Reporting
What are groups?
Optionally, an administrator can create groups in order to make administering and organizing security simpler. Instead of directly assigning users to roles, you can assign users to groups, and the groups are then assigned to roles.
Is there more than one kind of group?
There are two kinds of groups: single-user and multi-user.
What is the purpose of a single-user group?
The main reason to create a single-user group is to reduce the maintenance needs of workflow projects. By assigning a task role to a single-user group, if you later need to change the user, you only have to edit the group, instead of each task role.
Example: Rather than assign the owner role in multiple tasks to Michelle, the IT Manager, you can instead create the single-user group IT Manager, and add Michelle to it. Later, if Michelle leaves you only need to swap in her successor to the IT Manager group, rather than in all the tasks that reference IT Manager.
How do model permissions work?
A model creator is automatically granted the Model Administrator role, which has full Read and Write access for that model. To modify this access, or allow other users to access the model, an administrator can edit the model permissions to specify full or partial Read/Write privileges to specific dimension members or to the entire model.